Tools
Good tools make good games
Introduction
Good tools reduces repetitive tasks as much as possible, making it fun and intuitive for creatives to do their work. Bad tools can cause a lot of frustration, and massively reduce the efficiency of a team.
Creating tools for use within a team is a lot like creating a product for the public:
- Identify a need that you can solve with a reasonable amount of resources. This means asking people on the team what they need, observing them when they work, keeping your ears open for complaints about the work process, and using the workflows yourself.
- Come up with and pitch solutions to those that would use it, maybe with a UI mockup for instance. Do they get excited by the idea? If so it’s time to make a tool.
- Create a minimal working tool in collaboration with your users.
- Market the tool within the team. No one will use a tool if they don’t know that it exists.
- Keep supporting the tool, fixing bugs and adding features as needed.
This post showcases some of the tools I’ve created over the years.
Vismut
Vismut is an open source procedural texturing tool which has been my hobby project since around 2017.

Here are some of the reasons I’m working on this tool:
- I want to improve my skills in low level programming and everything that goes into making a tool like this.
- I want to try ideas for how procedural texturing could be improved.
Here are some things I’ve learned about while working on this project:
- Software architecture.
- Undo/redo using the command pattern.
- Multi-threading.
- Low level programming in the Rust programming language.
- Continuous integration.
Read the Introducing Vismut blog post for more information. The source code is available on GitLab.
Blender/Unity Import/Export tool
I think it’s important to have a tool for importing and exporting models to and from the game engine and the modeling tool. The reason is that 3D artists do these actions thousands of times throughout a project. Setting the right import and export settings takes time and effort that could be spent on iteration.
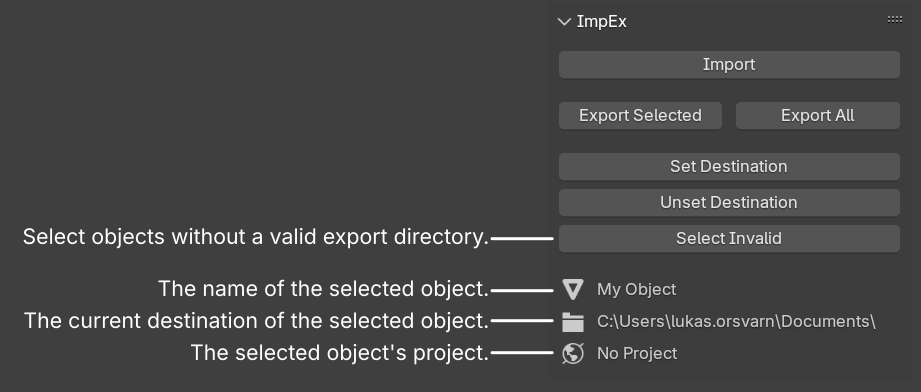
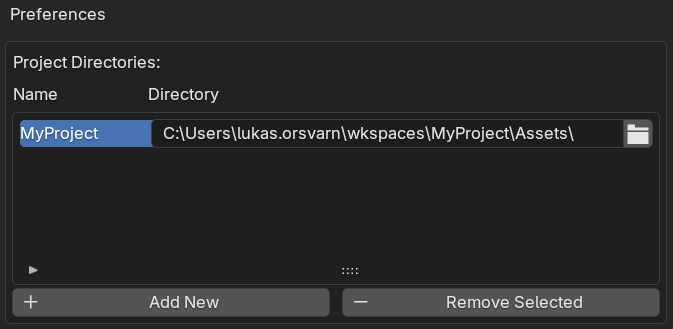
People on the team worked from home sometimes, so I implemented a system for making the export paths point to the right place on any computer. In the preferences for the add-on you can write in the path to any projects you’re working on. If you set this up on two computers, an export path set on either computer also works on the other one.
Here is a more comprehensive list of features:
- One-click export of selected models or all models.
- Automatic export settings, no need to worry about misconfiguration.
- Automatically centered and applied scale and rotation on models, reduced risk of human error.
- Set a model’s export path once, then it’s saved forever in the .blend file.
- There is a system in place that make the paths valid across computers.
- When you import a model from the project,
it saves where it was imported from.
- This speeds up the “import, tweak, export” worflow.
- Batch export and import.
- The artists liked to have one file with many models in, this feature smooths out that workflow.
- Support for several models in one file.
- Exporting a “collection” in Blender treats the collection as a file, and each mesh in the collection as a mesh in the file.
- High quality user experience.
- Clear tooltips on everything.
- Gray out buttons when they can’t be used.
- A message tells the user the next step they need to take to be able to export something.
- Clear warnings and errors.
- Good default hotkeys.
- Always keeping Blender’s undo stack in mind to avoid issues.
The team I worked with was used to the .fbx files in the project being the source of truth, and this tool was built for that workflow. I prefer having the .blend files as the source of truth to preserve for instance modifiers. I felt that pushing for this type of change would be more appropriate to do between projects though, so I decided to wait with that.
Receiver 2 Physics Tool
We wanted to have many physical objects in Receiver 2, so it was important to make it fast to set up new ones.
This Unity editor tool makes it easy to set up an object to be physical. just select the object, activate the tool, and select which material it should be.
The tool creates all the objects needed, sets the selected material on them, puts everything on the correct layers, and adds and configures the required components.
This tool reduced the time to make an object physical from minutes down to seconds. But the benefit of a tool like this can’t be measured only by how many seconds it saves in mechanical actions, the most important benefit of a tool like this is that it saves on brainpower.
By removing the boring and repetitive tasks in someone’s workflow, they can spend their brainpower on what matters. When people have to worry less about technical details like which layer an object should be on, it’s easier for them to achieve flow and get more done.
Kravall Level Editor
For the student project Kravall we needed a way to edit levels. I took on the task to create a solution for this, and the result was a custom plugin for Blender.
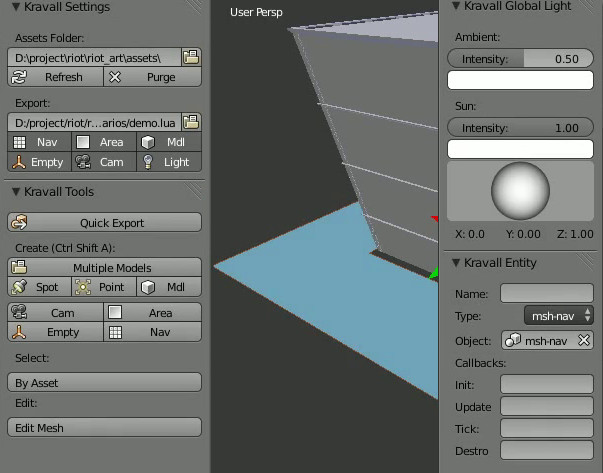
This plugin added a new toolbox to Blender to make it easy to place all the different types of objects needed for the game, as well as create a navigation meshes, and script the level.
I also wrote the script for exporting the level to the game format.
Cell Material Editor
One friction point when creating assets for the student project Cell was creating new materials. Materials were manually defined in .xml files, making for a slow and error-prone workflow.
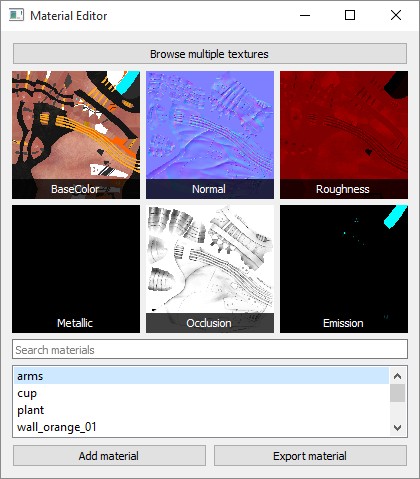
I wrote a tool that allowed artists to add a new material in a list, and then they could browse and pick which images they wanted for the material. Several images could be chosen at once, and the end of the file names were used to know which slot to use it for.
The tool then packed and exported the textures to the game folder. This way we could change the packing scheme later in development with little extra work. Another benefit is that the artists didn’t need to care about how the textures were packed.